jeudi 18 août 2016

MFT Camp Create: Stunning Shadow Stamping

Hello there!

This is day 5 at MFT Camp Create, well I'm a bit late but let's say it's day 5, and the technique of the day is shadow stamping. It means that you stamp first with white pigment ink and then you stamp a second time with the same stamp but dye ink (color of your choice) a bit on the side. Not sure if you get it because my English is not perfect.
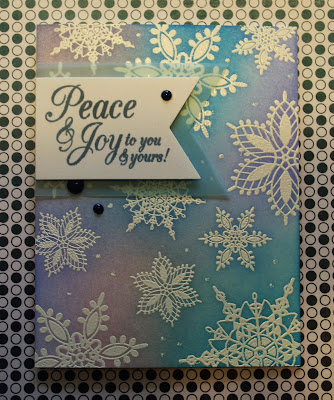
Anyway I did shadow stamping with MFT Sophisticated Snowflakes on baby blue cardstock.

The card will speak for itself:

Once again I am sorry for the poor lighting. 
Hope you enjoyed my card for this summer camp, one more to come but before I grab my badge:
Print

See you later!
xoxo
Lucie

MFT Camp Create: Divine Dry Embossing

Hello and welcome back!

The technique of day 4 at MFT Camp Create was dry embossing and this is not something I do very often, I did it once and I was not entirely satisfied.
This time I am so happy with what I did.
I dry embossed the Stitched Cloud Edges onto some white cardstock and my dies were still attached because it was the first time I was using them. It took me a while because I was confused with the plates in my big shot.
Then I stamped a flying pig from the Hog in Heaven stamp set and also the sentiment on a banner cut in blue vellum. I fussy cut the pig and I was ready to assemble my card.


For the final touches I glued some hearts previously cut from red glitter paper.
As of now I will think more of dry embossing, it adds dimension and it's not that difficult when you know which plates to use.

Here is my badge:
Print
See you later
xoxo
Lucie


MFT Camp Create: Remarkable Resist

Hello!

Still working on My Favorite Camp Create and learning new techniques.
Today is about Resist and I really like this technique which I do often.
For my card I used the Sophisticated Snowflakes from MFT, this stamp set has retired last year. I heat embossed snowflakes with white embossing powder on white cardstock, then I applied distress ink, I chose 3 colors: Spun Sugar, Shaded Lilac and Salty Ocean. I die cut 2 banners out of white cardstock and blue vellum. I stamped the sentiment on the smaller banner made of white cardstock. For the final touch I once again added enamel dots that I made.

Let's have a look at the card:

I hope you like it and it's time for me to grab the badge of the day:

Print
See you later for another card.
xoxo
Lucie

mercredi 17 août 2016

MFT Camp Create: Awesome Ombre


Hello!

I am planning on writing all my posts today because my cards are all ready for Camp Create.
So this second post is about Ombre, Awesome Ombre!
This is not something I do a lot but the other day I found an ombre ink pad at Michaels so it is a good opportunity to use it now.
For my card I used the Circle Scribble Flowers stamp set and the Label maker for the sentiment.
I first stamped the flowers and did a bit of masking then I stamped the sentiment. I glued my piece on some patterned card base. I added a thin stripe of glitter paper and finally some enamel drops. By the way the one on top is to hide a stain because of my inky fingers!
Here is my finished card:

Now I can grab the badge I earned:

Print
See you in a few minutes for another card for Camp Create by My Favorite Things.
xoxo
Lucie

MFT Camp Create: Monochromatic Magic


Hello!

After a well deserved vacation in Europe I am back on the blog. By the way I missed one session of Camp Create while I was on vacation but for the last session I am ready. Let's start!

The theme for the first day is: Monochromatic Magic.
I chose Pink which is quite unusual for me but I had a very girly card in mind.
For my card I used the Funky Flowers stamp set and You've got mail for the sentiment.
I did some fussy cutting, die cutting, heat embossing, I created my own enamel dots and here is the result:

Sorry for the shadow I am not the best photographer but I hope you enjoy the card. Now I can grab my badge.
Print
See you later for another post and another card for Camp Create by My Favotite Things.
xoxo
Lucie

mercredi 22 juin 2016

Camp create day 2: Sensational Sliders

Hello there,

Here I am with my last card for MFT Camp Create. On day 2 the theme was Sensational sliders.
This was a big challenge as I've never made any slider card, I don't have the special die cut so I had to be creative.
The best way to me was to use a craft knife.
Let's have a look at the card:


I used the bionic bots stamp set, the label maker stamp set, both from MFT. Now you can see the little robot is moving:


This card was a real challenge to create and it took me quite a long time but I am very satisfied with the result and I can grab my fifth and last badge from MFT Camp create:

Print

Thank you for reading
See you soon.

xoxo
Lucie


mardi 21 juin 2016

Camp Create: Spectacular Shakers

Hi!

For day 5 at MFT Camp Create it's all about Shaker cards.
For my shaker cards I used the Penguins in paradise from MFT and Pretty Pink Posh Storybook 2 die.
I filled my windows with yellow, blue and green sequins.
I colored the penguins and the palm tree with Touch markers and glued them on my windows.
Finally I stamped the sentiment.
Here is my card:


And now I can grab my badge:

Print


See you soon for my last card of Camp Create.

xoxo
Lucie

lundi 20 juin 2016

Camp create - day 4: Delightful Die Cutting


Hello there,

I am back with another card for day 4 of MFT Camp Create.
And it's about die cutting.
I chose to do partial die cutting. And I decided that my background would be transparent so I took acetate, stamped stars with white Stazon. Well it's easier to understand with a picture:

I colored the little lady, masked her to use a brick stencil with distress and added the sentiment.
That was not an easy card. Moreover I doubled the partial die cutting so that the glue cannot be seen from behind.
I am very proud of my card and as I completed day 4 of Camp create here is my badge:


Print

Have a nice day and see you soon!

xoxo
Lucie

dimanche 19 juin 2016

Camp create day 3: Wonderful WATERCOLOR


Hi everyone,

I'm back for day 3 of MFT Camp Create.
I did not forget day 2 but it is still in the work.
So for this third day it's all about watercolor. And the first stamp set Ithought of was the sketch blooms from MFT. It is easy to use and it can be messy.
I die cut an oval in watercolor paper and stamped with hybrid black ink the outlines of the flowers.
Then I took the overlays, colored them with my zigs real brush markers, sprayed water on them and finally stamped on my watercolor paper. Once it was done for all the flowers and leaves I sprayed my paper to give it a messy look.
For the sentiment I spamped a banner and cut it with the coordinating die.
For the background I chose black paper to give a dramatic look to my card, I stamped it with versamark ink and used some Ranger liquid platinum embossing powder.
I assembled my card and added a few drops of red paint.
Here is the final result:

Hope you like it.
And now I can get my badge:

Print


See you soon for a new card.

CASology challenge: MASCULINE

Hello there!

For week 202 at CASology the theme is Masculine.
As it has to be clean and simple I only used one die and one stamp.
I die cut a mustache 6 times and glued them on top of each other to give some dimension to my card.
Then I stamped the sentiment.
It couldn't be any easier.
The mustache die is from a French company: Kesi'Art (http://www.kesi-art.com/fr/metaliks/553-metaliks-mr-3760172967897.html)
The sentiment is from Technique Tuesday (https://www.simonsaysstamp.com/product?id=309692&currency=USD)
Here is the result:


Have a great day
See you soon.

lundi 13 juin 2016


Camp create : Glitzy GLITTER


Hello there!
This week My Favorite Things is throwing a summer camp called camp create.
There will be challenges from today until Friday. Of course I'm in!
The theme of today is Glitzy glitter.
Usually I don't play with glitter because it's messy but I never say no to a challenge.
So here is my card:


First I die cut the envelope, it's the You've got mail die from MFT, I folded it and add a bit of distress to make it look old. Then I die cut the hearts (mini hearts from Simon says Stamp) onto red glitter paper (from the dollar store) and glued them so that they get out of the envelope. Finally I stamped my sentiment on white paper and used two different colors easily thanks to the MISTI. 
And here we go! I hope you like it.
Print

Have a great day and have fun creating!


mercredi 25 mai 2016

Casology challenge week 198: Stencil

Hello there,

It's been a while but I promise I will come more often.
So last week I participated in Casology challenge, the theme was stencil.
My favorite stencil is a brick one from My Favorite Things, I used it not very carefully with two distress inks (abandoned coral and fired brick) on white cardstock.
At that time I was inspired by street art adn simply stamped a sentiment and other stamps.
Here is the final result:
And I got an honorable mention!!

Have a great day!

mardi 23 février 2016

Un coq et du liquide masquant... un beau combo?

Après avoir vu des vidéos et lu des tutoriels le liquide masquant m'a attirée et la raison principale c'est super simple à appliquer! Le papier masque, il faut le couper et si on n'a pas le die qui va avec l'image c'est long et quand on est impatiente comme moi, on opte pour le liquide masquant. Alors j'ai décidé de tester le molotow, un liquide bleu. D'abord j'ai tamponné mon image, un joli coq de Simon Says Stamp et je l'ai recouvert de ce fameux fluide masquant. La grande question en attendant que ça sèche et c'est rapide, c'était est-ce que j'en ai mis assez?


Une fois que le fluide était sec, j'ai ajouté de la couleur pour un fond, j'ai choisi de la distress parce qu'elle réagit à l'eau puis j'ai aspergé de gouttes d'eau pour un effet fouillis controlé.


 Ensuite vient le moment tant attendu, je retire le masque avec une petite gomme. Est-ce que j'ai gommé trop fort? Peut-être parce que le papier en dessous était abîmé et j'étais super déçue.


 J'ai quand même fini ma carte, j'ai colorié le petit coq, j'ai utilisé un stylo pour repassé les contours, j'ai ajouté du glossy accent sur les yeux du coq et j'ai mis un peu de brillant sur le cadeau avec mon stylo brosse wink of stella. Pour la touche finale, un peu de ficelle rouge et finalement je ne suis pas si déçue.